DIY guide to building a braai and being summer ready
Category General News
You can choose to buy a standalone braai or one that needs to be built in, either way it's a must-have for enjoying quality time with your friends and family.

Location
When deciding on your outdoor braai, it's important that you have the space to accommodate it. Most importantly, it needs to be well ventilated and have enough room for the person who is going to be doing the braaing, as well as your guests who will be enjoying the sizzling spoils.
Built to last
And while braais come in every conceivable shape and size from any number of different outlets, if you are serious about braaing and enjoy your DIY, what could be more satisfying than building your own, says Build It.
What you'll need to build your braai
- Tape Measure
- Spirit Level
- Square
- Brick Laying Trowel
- Chisel
- Club Hammer
Design your braai
Once you have chosen a location, deciding on the look and style of your braai is the next crucial step. Building a brick braai on your patio is very simple and sketching a design of your braai first will make it even easier, suggests Homify.
Homify also recommends you dig a few centimetres into where your base will be, before "using self-levelling cement to pour your base. Thereafter, you can place the bricks stacked with a centimetre of separation and continue this throughout the rest of the design".
"Connect the bricks with a cement mixture. Take a bucket and pour in part of the cement, mixed with water and sand. If you have doubts, consult a mason to advise you. It is, however, not a difficult task if you take brick by brick and put the mixture into the base, then level carefully so that everything is firm and smooth.
"You should only continue with the other rows when the previous is dry and firm, until you have completed all the work. If you still have doubts, be sure to call an expert.
Placing your grill
The grills are one of the most important aspects when building a braai.
"The grilling area can be secured on the side with staggered brick base anchored in the cement. We recommend placing on the sides two pairs of brackets at different heights for a movable grate. It is the best when you can enjoy different degrees of cooking, especially when it comes to your meat dishes," according to Homify.
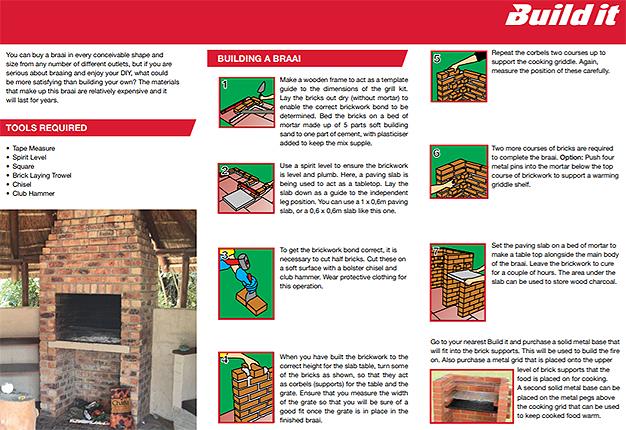
With this step you need to "measure the width of the grate so that you will be sure of a good fit", says Built It.
"When you have built the brickwork to the correct height, turn some of the bricks out sideways, so that they act as corbels (supports) for the table and the grate. Ensure that you Repeat the corbels two courses up to support the cooking griddle. Again, measure the position of these carefully. Two more courses of bricks are required to complete the braai. Push four metal pins into the mortar below the top course of brickwork to support a warming griddle shelf".
Author: Property24


